
Life for our little family has been, well, pretty crazy to say the least.
Between Andy's car trouble,
a major family sickness where we were all flat in bed for a week,
catching up on Isaac's missed school work,
our fish jumping out of his bowl :-(,
getting a new fish,
Primary President Responsibilities (for our church),
and just trying to keep up with everyday life,
there has not been a whole lot of extra time for blogging.
I am now back and just in time to tell you about
March's Craft Group!
I hosted this month, and we all made four Tile Pictures/stamped Coaster's.
These were so fun and easy to make.
All of the ladies did such a great job, They all just really turned out so cute. I would show all of them, but this post is already going to be so long. So, here are just a few of the finished Coasters:


Here are the instructions on how to make these fun Coasters:
Tile Picture Coasters:
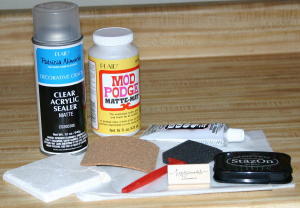
Supplies:
- 4" x 4" Tumbled Tile (Wipe down with a damp cloth to remove any dust and let dry completely)
- Tissue Paper
- Mod Podge®
- Tape
- Foam brush
- 4” x 4” Cork
- Permanent glue
- Stamp (optional)
- StazOn®(permanent inkpad)
- Acrylic Sealer
Step-by-Step
-
Cut a piece of tissue paper and tape it to a regular sheet of paper. (This way it will feed through the printer.)
-
Print picture on tissue paper and trim to fit tile.
-
Apply a thin coat of Mod Podge™ to tile.
-
Place picture on the tile.
-
Apply another thin coat of Mod Podge™ over picture and then let dry.
-
Ink stamp with Stazon™, and stamp on tile. Let dry, then cover entire tile with another layer of Mod Podge.
-
After letting the Mod Podge™ dry completely, spray with acrylic spray, following directions on can.
-
After tile is completely dry, turn it over and apply permanent glue to one side of the cork square.
-
Attach cork glue side down to the back of the tile and press down firmly.
-
Let the glue dry and enjoy your coaster!
We also had some 'Girly' food:
-Papa Murphy's Garlic Chicken Pizza
-Fruit and Poppy Seed Salad(found here)
-Mint Brownies(found here)
As always we had a really great time talking, eating, and crafting. I LOVE craft group :-)


20 comments:
i hope things slow down for you soon!
the tiles turned out so cute!
i might have to try that sometime!!
Those are way cute!! I am so glad you posted instructions. I am totally doing those sometime. I love yours.
I love the coasters. I am not super crafty so it is always fun to see what you guys create each month; I look forward to it.
Hope things slow down for you. I think the sickness went to everyone this year :(
Hey I'm glad you guys are feeling better, sickness can be so hard when everyone has it!
Love, love, love those!! Thanks for the instructions... I may have to try those!!! Glad to hear that you are all doing better! Here's to a "normal" few weeks!
Your tiles turned out great! I'm glad you are all feeling better and good luck with your calling :)
Craft group was super fun, thanks! I really hope you can stop and catch your breath now with all that has been going on.
what a FAB Idea! I totally love it. I think I'm going to have to do that one for sure...
You always have such fun ideas! And I love that you share the instructions and recipes with us all!
This is so easy and a great idea! well done!
These are so cool! Thanks for sharing. I can never find coasters I like.
where do you find the tumbled tile (4 x 4)?
Erin,
I bought the coasters at Home Depot in the tile section. Hope that helps :-)
Thanks!! I was able to find them and can't wait to see how they turn out : )
I seldom leave comments on blog, but I have been to this post which was recommend by my friend, lots of valuable details, thanks again.
I have just tried these for the first time, and I am having an issue with the ink smearing? any suggestions?
Ink problem here too!
Print on the lowest ink volume possible.
How do you get the "pink-old" look? And when do you apply the color?
Post a Comment